Microcontroller Project

Raspberry Pi Student Web Server

Project
Introduction and Description


raspberry pi imageThe challenge is to create an educational or academic application for the Raspberry Pi single board computer/microcontroller platform in my content area of eighth grade computer science.

The focus of this challenge was to create an academic application or lesson for the Raspberry Pi Single Board Microcomputer, and then select the most viable, authentic and relevant application for development and implementation in to my computer science classroom. In researching an academic purpose for my chosen product, the Raspberry Pi 3, I have discovered that there are many fascinating applications and projects that can be created with the Raspberry Pi. The goal, however, is to find and select an application or purpose that aligns with and supports the standards and objectives of my computer science classes. 

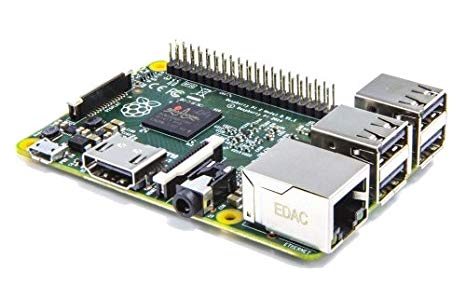
The product that I chose for the SBM challenge is the Raspberry Pi. Raspberry Pi is the name of a series of single-board computers made by the Raspberry Pi Foundation. The Raspberry Pi is an affordable, low cost, credit-card sized computing platform, on a single printed circuit board. The Raspberry Pi plugs into a computer, monitor or TV, and uses a standard keyboard and mouse. In addition, the circuit board provides analog and digital inputs and outputs, memory, storage and provides a set of GPIO (general purpose input/output) pins that allows control and interaction with other electronic components and Internet of Things (IoT) applications and devices for physical computing. The Raspberry Pi 3 runs on a customized Debian Linux operating system called Raspbian (Raspberry Pi Foundation, n.d.). 

The product I have is a Cana Kit which contains a Raspberry Pi 3 Model B, a case for the Raspberry Pi, a 2.5A Power Supply, GPIO Breakout Board & Ribbon Cable, USB MicroSD Card Reader, HDMI cable, and various wires, connectors, and diodes. The Raspberry Pi 3 Model B has a Quad-Core 1.2 GHz processor and 1 GB of RAM as well as on-board Wi-Fi and Bluetooth Connectivity (Cana Kit Corporation, 2016). In addition to the Cana kit, I also have a SunFoundry sensor kit and a DIY expansion kit to provide more possibilities for developing educational or academic applications with the Raspberry Pi.

Computer Science: Purpose


html
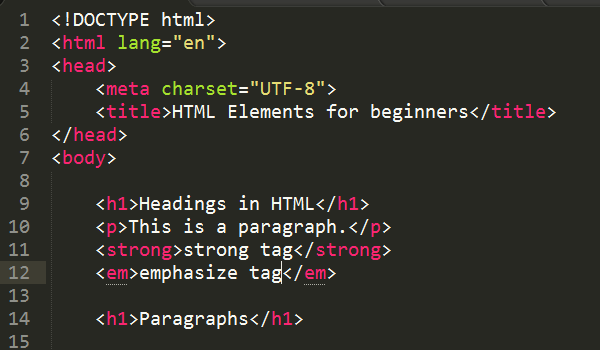
The purpose of the Web Design Unit is to serve as an introduction to the design, creation, and maintenance of web pages and websites. In the unit, students will learn how to critically evaluate website quality, create and maintain feature rich, quality web pages and learn about web design standards. Students will create, link together and share information with others through student developed web pages and servers. Web pages and web servers are the components of web design and development that allows this creation, interaction, linking and sharing of data as information to take place. The basics of HTML and CSS are introduced as methods for describing features of web pages that students can use to design and develop their web pages based on their culture, personal interests and unique experiences. The HTML and CSS lessons are scaffolded in order to provide all students an entry point into web design and development, but it is likely that as students explore and develop their web pages they will encounter features they wish to add to their web pages but do not yet know how to implement. In this instance, students will be encouraged to formulate their own learning and work ahead to figure these features out so they may add and apply them in their web pages before formally presented and taught in class.

Students will…

  1. Gain the skill and project-based experience needed for entry into web design and development careers..
  2. Be able to use a variety of strategies and tools to create and share out web sites.
  3. Develop awareness and appreciation of the many ways that people access the web, and will be able to create standards-based websites that can be accessed by the full spectrum of web access technologies and servers.
  4. Learn more about the problem-solving and logical thought processes of web page and web server creation.
  5. Learn how HTML can be used to format and present information to users that can be shared to extend knowledge beyond computing into other areas, classes and disciplines.
  6. Develop and deploy their own student web server using the Raspberry Pi platform.
  7. Gain accountability and real world authenticity and experience through developing, managing and maintaining their web pages, sites and server so information is correct and up-to-date.

This unit will allow students to further develop and refine additional programming skills utilizing prior knowledge, skills, logic and experience that have been obtained in previous languages like Scratch and App Inventor. The students will be able to view the digital manifestations of their web pages and files in the context of viewing their web pages on and through various web browsers.

The students will work independently and in small groups to learn, develop and practice their web design skills and web server knowledge, and learn the different HTML commands to program a web page to perform and complete various tasks.

In this unit the students will use the Code.org Web Lab coding interface which will allow the students to create and view their code at the same time so they can focus more on the thought process, debugging and logic of creating a web page to format information in a clear and meaningful way. Additionally, the students will learn the complex syntax and semantics of HTML and CSS languages.


Computer Science: Standards


Every great lesson starts with addressing the standards that that lesson or unit is going to cover.

Here are the following standards that this productions application covers and supports.

This lesson is aligned with the 2018-2019 Nebraska CTE Course Standards and Programs of Study - Middle-Level Courses for Communication and Information Systems:  Introduction to Computer Science (270411) – and the Nebraska Science Standards

Standard 3 - Computational Thinking
     Indicator 3.2 - Use the steps of computataional thinking to solve a problem. (Decompose,
                                 Patterns, Abstraction and Algorithms.)


Nebraska Science Standards

     P1, 3, 5 - Define the criteria and constraints of a design problem with sufficient precision to
                      ensure a successful solution, considering potential impacts on people and resources
                      that may limit possible solutions. 

     P6, 8    - Design a solution to a complex real-world problem by breaking it down into smaller,
                      more manageable problems that can be solved through engineering. 

                                                                                                           (Nebraska Department of Education, 2018)

This lesson is also aligned with the 2018-2019 Nebraska CTE Course Standards and Programs of Study - High School -Level Courses for Communication and Information Systems: Foundations of Web Design (270604) –  

Standard 3 - Web Techmologies and Solutions
     Indicators 3.14 - Apply appropriate industry language, terminology and practices.  
     Indicators 3.23 - Create a web program that will utilize multiple languages and servers. 
     Indicators 5.4  - Design, develop, implement, maintain, and evaluate web solutions.
 
                                                                                                           (Nebraska Department of Education, 2017)


Unit Overview

The Web Design Unit occurs after the App Inventor and Robotics units in the Introduction to Computer Science II course curriculum.
Each “Lesson” will take multiple class periods to cover.
There are 8 lessons which will be delivered over multiple class periods. Assignments, along with formative and summative assessments are built in to each lesson. At the conclusion of each lesson, students will be asked to complete an independent assignment used to demonstrate their understanding and knowledge of each skill presented. The unit will conclude with a summative exam and creative task project.

Lesson Lesson TItle Duration
Lesson 1HTML Basics – Creating Your First Web PageFourClass Period
Lesson 2HTML Visuals and Graphics - Images and LinksFourClass Period
Lesson 3Apache Web Server – Sharing Your Web PagesThree Class Period
Lesson 4CSS – Adding Style to your web pagesFour Class Period
Lesson 5HTML & CSS – Page LayoutFive Class Period
Lesson 6HTML Tables 
Three Class Periods
Lesson 7Adding Multimedia and FormsThree Class Period
Lesson 8Web Server Security Two Class Period
Lesson 8Micro:Bit Robot – Line FollowingOne Class Period
  One Class Period in 90
minutes

Project Materials

If you want to duplicate or recreate my project, here is a list of materials and where you can purchase them from if you don't already have them. Most Raspberry Pis and CanaKits can be purchased directly from Amazon.com.

To create the initial application of an Apache web server for my computer science class I started with the provided the Raspberry Pi. However, to deliver the full and final application of the project for my web design unit, I would require 20 Raspberry Pi single board computers. My goal is to have each student create, manage and maintain their own web server for the duration of the class. All of the cables needed for the creation of the application are already provided in the CanaKit. However, I will need additional VGA male to HDMI female adapters to connect the Raspberry Pi to the computer monitors. In addition, I will require 20 computer monitors, keyboards and mice and four power strips. My computer science classes are held in my classroom/computer lab which consists of 25 iMac desktop computers. My student desks are 4 feet by 3 feet and will provide enough space for the complete Raspberry Pi set-up and the iMac computers to sit side by side during the application and teaching of the web design unit. This will allow for easy access to both machines during set-up, configuration, testing and use of the web server.

The software and packages needed to create the Apache web server are all web-based so the Raspberry Pi’s will need to access to the Internet to download the required software. Due to the Raspberry Pi 3 Model B’s wireless only being able to receive/broadcast on a 2.4GHz frequency all of the Raspberry Pis will need to have access to Ethernet. This is because the my district's wireless network only broadcasts using the 5Ghz frequency. This will require running extra Ethernet cables to the Raspberry Pis as well as to a 24-port classroom networking switch to connect to the Ethernet network. The need for the switch and Ethernet cable(s) could be mitigated by purchasing USB 5Ghz wireless adapters to provide the wireless connectivity to the Raspberry Pis.

Finally, Building Technology Support Personnel will need to be contacted for the installation and configuration of the network switch and for obtaining reserved IP numbers to use when setting up the initial networking of the Raspberry Pis. This will allow the Raspberry Pis to have a dedicated IP address which will keep the web servers from being blacklisted by the my districts network security.

Additional resources for a success project, not included in the chart below; 

  • Administrative materials: Code.org student accounts, 25 Reserved IP addresses for the Raspberry Pi/Apache web servers. Building Tech Support personnel to provide the IP addresses for the web servers.

  • Instructional materials: Student lesson directions, student command line cheat sheet, other HTML worksheets and PowerPoints for the all lessons loaded into Canvas and set with appropriate permissions.
    Student access to the In-class Activities and Assignment folder.

  • Class Materials: Access to Code.org Web Lab, Raspberry Pi 3 B+, Raspberry Pi Micro SD Card and Cables, iMac Computers, Internet Access, Access to OPS Canvas LMS,

  • Additional materials (might be used as part of the unit): Whiteboards with dry-erase Markers, Online Design/Programming OneNote Notebook, Flowchart paper/software

    This product’s application will require the teacher to have knowledge and skill in working with a Linux operating system and creating and configuring a basic web server. Also, the knowledge of how to create and set users and groups, networking settings and security access will also be needed. This application does not require any prior set-up of the Raspberry Pi as the students will assemble the computers during the build phase. 

ItemItem Number
Vendor Item Cost QuantityCost
Raspberry Pi 3 B+
Complete Starter Kit – 32 GB Edition
Pi3-STR32-C4-BLKABOX$79.9720$1599.40
HDMI to VGA Monitor ConverterAV-107-BK-USTendak$14.9920$299.80
Computer Monitor---------20n/a
Mouse---------20n/a
Keyboard---------20n/a
* Items that will be supplied by my school.   Total Cost
$1,899

Project  Operation

Creating the Raspberry Pi Student Web Server


To recreate or duplicate my Single Board Microcontoller project and create your own Student Web Server using the Apache software please follow these steps.

First, unpack the Raspberry Pi and use the following diagram to assemble the Raspberry Pi.

Raspberry PI Diagram

                                                                        (Raspberry Pi Foundation, 2017)


Setting up the Raspberry Pi


After putting the Raspberry Pi together and powering on the SBM.

The students will use the default Pi user to create their user accounts on the system.
To do this the students will use the

sudo adduser <their username>
command to create their account.

The students will then elevate their user access to super user status using the

sudo usermod -aG sudo <username>
command.

Additionally, they will add themselves to the Apache web server group by using the

sudo usermod -aG www-data <username>
They can then check their accounts and permissions using the

id <username>
command.

Finally, the students will change the default Pi user password from ‘raspberry’ to their own student id for security.


Install Apache


First, to begin the installation of the Apache2 package, update the available packages by typing the following command into the Terminal:

sudo apt-get update

Then, install the apache2 package with this following command:

sudo apt-get install apache2 -y

Test the web server

By default, Apache puts a test HTML file in the web folder. This default web page is served when you browse to http://localhost/ on the Pi itself, or http://192.168.1.10 (whatever the Pi's IP address is) from another computer on the network. To find the Pi's IP address, type hostname -I at the command line (or read more about finding your IP address).

You can also test the status of the web server by typing in the command:

sudo systemctl status apache2

Browse to the default web page either on the Pi or from another computer on the network and you should see the following:

Apache success message

If you see the above message it means you have Apache working!


Changing the default web page

This default web page is just an HTML file on the filesystem. It is located at /var/www/html/index.html.

Navigate to this directory in a terminal window and have a look at what's inside:

cd /var/www/html
ls -al

This will show you:

total 12
drwxr-xr-x  2 root root 4096 Jan  8 01:29 .
drwxr-xr-x 12 root root 4096 Jan  8 01:28 ..
-rw-r--r--  1 root root  177 Jan  8 01:29 index.html

This shows that by default there is one file in /var/www/html/ called index.htmland it is owned by the root user (as is the enclosing folder). In order to edit the file, you need to change its ownership to your own username. Change the owner of the file (the default pi user is assumed here) using sudo chown pi: index.html.

You can now edit the files and then refreshing the browser you will see the web page change.

Your own website

If you know HTML you can put your own HTML files and other assets in this directory and serve them as a website on your local network.

Now the students can upload their HTML files and other page assets, images, and media to this web directory and then serve them out to peers and teachers as a website on the local school’s network. (Raspberry Pi Foundation, n.d.)


Video Demostrations

Product
Reflection and Evaluation


raspberry pi in caseThe Raspberry Pi as a Student/Classroom Apache web serber allowed me to fill a hole in my web design unit by allowing my students to publish web pages to a live web server. My favorite part about this challenge was watching my students excitement as other students looked and commented on their web sites and pages. Again, students started owning their learning by going out and researching ideas and elements they wanted on their web pages this in turn started conversations bewtween the students on who they got this or that piece of code or element to work on thier web page. 

Reflection of project's achievement of goals related to the Nebraska STEM Instruction Rubric.

     The Raspberry Pi single board microcontroller Models Excellence in promoting the understanding of              concepts across multiple content areas. The Raspberry Pi web server application was an ideal platform        for not only helping to support and cover the content standards defined by the Nebraska Department of      Education for middle level courses – Introduction to Computer Science & Web Design, but also to                    provide a means to solve a curricular short-coming in my web design unit. The web server lesson(s)                combined with the Raspberry Pi platform provided an opportunity for the students to deploy their own        web servers and utilize best practices to solve the real-world problem of information sharing and distant      communication via the Internet, a web server and HTML web page programming. From the use of this          application students will comprehend HTML and web server file structure and publishing with much              more breadth and depth of understanding which they are currently missing without the web publishing        piece. 

     The application of the Raspberry Pi as a web server Models Excellence in promoting the acquisition of          proficiency toward recognized, grade-appropriate standards. All the web design unit lessons were                  standards-based, designed and aligned to support and cover the Nebraska Department of Education            Standards for Middle Level – Introduction to Web Design, the Next Generation Science Standards (NGSS)      Applications in Technologies for Information Transfer & Engineering Design (NGSS Lead States, 2013), to      help students acquire competency in knowledge and skills for web design development and publishing.        Again, this application Models Excellence because it was designed to acquire competency that is                    currently lacking toward the recognized, grade-appropriate standards.  

     This SBM application only Meets the learner-centered activity, first-hand experience as defined by the
     Nebraska STEM Instructional Resource Rubric. In this application, the students are involved in every
     phase of the server development cycle from the research and defining phase to the building, testing and
     feedback phases. However, to achieve the ‘Models Excellence’ rating, the requirements state
     collaboration among peers and small groups of learners needs to take place. The creating of a student
     web server was not designed as a collaborative task due to its one-on-one, hands-on nature.
     Furthermore, while the students do have shared activities incorporated in the learning activities and              lessons, they did not participation in groups or teams while completing and publishing their              
     independently created web server, pages and projects. So this SBM onlt Meets the qualifications for a
     learner-centered activity.

     The application of the Raspberry Pi as a web server Models Excellence because it promotes critical                thinking, creativity, collaboration and communication (4C) skills through STEM in a school-based                    application. All the lessons in the web design unit required the students use and apply various                        technologies. Even without creating the web servers, the process of creating and uploading HTML/CSS        web pages to the web server, testing, and debugging required the use of critical thinking and creativity        skills.  Finally, students developed communication skills by designing and creating a website that not
     only shares information about themselves, the school and student-centered projects but also
     incorporates best practices in web design and server skills. Again, this application Models Excellence
     because it promotes acquisition of new or advanced “4C” skills through Technology, Science and
     Engineering. 

References


Cana Kit Corporation. (2016). Raspberry Pi premium clear case [Graphic Image].         
     CanaKit. N.p., n.d. Retrieved February 24, 2019, from
     https://www.canakit.com/raspberry-pi-clear-case.html 

Cana Kit Corporation. (2016). Raspberry Pi Model B [Graphic Image]. CanaKit. N.p., n.d.  
     Retrieved February 24, 2019, from https://www.canakit.com/raspberry-pi-3-model-
     b.html

Computer Science Teachers Association (2017). CSTA K–12 Computer
     Science  Standards, Revised 2017. Retrieved January 14, 2019,
     from 
http://www.csteachers.org/standards. 

Nebraska Department of Education. (n.d.). 2018-2019 CTE course standards and
     programs of study. Middle-Level Courses: Introduction to Computer Science,  
     270411 [PDF file]. Retrieved January 22, 2019, from
     http://cestandards.education.ne.gov/Courses/270411_Middle%20School%20
     Computer%20Science.pdf Raspberry Pi Foundation. (n.d.) Setting up an Apache
     Web Server on a Raspberry Pi  

Raspberry Pi Documentation. N.p., n.d. Retrieved February 25, 2019, from            
     https://www.raspberrypi.org/documentation/remote-access/web
     server/apache.md.

Upton, Eben. (2014) New product launch! Introducing Raspberry Pi Model B+ [Blog].
     N.p., n.d. Retrieved February 25, 2019, from
     https://www.raspberrypi.org/blog/introducing-raspberry-pi-model-b-plus/

Address

3802 Reddick Ave
Omaha, NE 
68112

Contacts

Email: Randall.Henderson@ops.org         
Phone: 531-299-8922                     
School: 531-299-2440